Because sanding is the ACTUAL WORST thing I carry out in all my Dos it yourself. Seriously, it's like ironing. Or mopping. I absolutely hate it. Give me a rag and some Windex, which is a-ok with me! LIKEWISE, another AMAZING thing about this paint is that you DO. NOT (Cabinet Painters Near Me). NEED. TO.
THE. CABINET. DOORS! SAY WHHHHHHATTTTT?! No but seriously, leave those suckers on there! I did pull the drawers out simply because it was simpler to access them, however I left all the doors on! And as soon as you are prepped (do not forget to utilize Frog Tape (much better than painters tape) to tape off any surfaces you do not desire getting paint on them, like walls and floors and countertops), you actually simply paint it on! Start with the frames, and then deal with the fronts of the doors, and then the backs.
By the time I completed one coat, everything was currently dry. I waited about 15 minutes in between simply to be safe, but I actually could have begun again on coat # 2 as soon as I was done with the first one. Start by painting the frames. Next, paint the door fronts, and then the backs (clearly leave the doors open so they don't dry shut).
If you DO wind up with a little splitting, as I did, simply take a small brush and retouch. Giani cautions that if you do touch ups, the finishes might dry in a different way. This was sort of true on mine, but I chose the very small difference in finish to the fractures.
Let dry for at least 8 hours (I always wait longer normally 1-2 days just to be safe) and voila! Pull off your tape, close your cabinet doors, put your drawers back in, and you're done! Does this appear like the easiest tutorial ever in life? That's due to the fact that it is! Literally.
3 Simple Techniques For Plastic Wood ® All Purpose Wood Filler Cabinet Painting Contractors 28206 - Dap Products
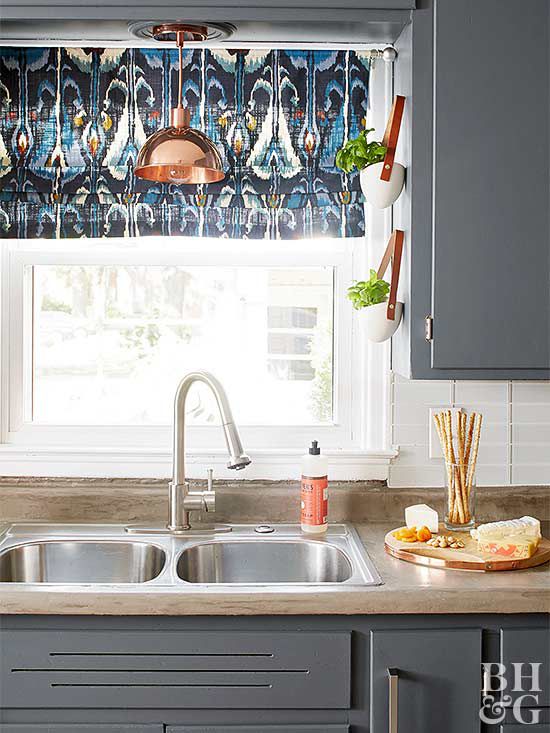
Smooth, Refined - Cabinet Painters 28269. And a spectacular greige color! Isn't it stunning? It genuinely transformed out home builder grade vanity! Genuinely, I'm obsessed. If you desire a fast and simple item to assist transform your cabinets, Giani Nuvo cabinet paint is your response! I believe the after pictures speak for themselves! I would not be reluctant to use Giani's Nuvo Paint once again.
A common misunderstanding is that your laminate cabinets are stuck looking outdated, only to be resolved by acquiring pricey new cabinets. Not true! With some paint, sandpaper and maybe some fashionable pulls, your worn out old cabinets can look trendy and brand-new. What You'll NeedSandpaper (240 and 150 grit) Disinfectant spray (Clorox Antibacterial, Ajax, 409 or comparable) Ground cloth or old sheetsMicrofiber fabric and a clean ragWater-based primerWater-based paintTwo foam rollers and rolling pansMasking/painter's tapePermanent markerOptional: New handles and hardware for an upgraded lookBut wait! Don't believe you have the time to refinish your cabinets on your own? Let your local Mr.

Handyman today by calling 877-256-3376 for an estimate on your next house improvement project. Before you start, make sure your cabinets aren't peeling or cracked. If you find some broken laminate, you'll wish to replace the laminate (if not the whole cabinet face). If an area is only peeling, sand behind the exposed corner and reattach it with water resistant adhesive, utilizing masking tape to hold it in location till dry.
2) Lay the cabinets on a level surface with the edges available and cover your surroundings with ground cloth or old rags. 3) Utilize your painter's tape or masking tape to line the within edges of the cabinets to avoid paint from dripping. 4) With your tidy rag and cleaner, scrub down the paintable areas of your cabinets with warm water. Cabinet Painting Contractors 28227.
5) After your cabinets have actually dried, sand them with 240-grit sandpaper and wipe them down with your microfiber fabric to get rid of as much dust as possible. 6) Use a water-based primer with your foam roller. 7) After the first guide coat has dried, sand with 150-grit sandpaper (Cabinet Painting Contractors 28205). 8) Apply a second coat of guide and sand again with the 150-grit paper, ensuring to wipe away any particles.
What Does How To: Fix Chipped Paint - The Craftsman Blog Mean?
10) Let the very first coat dry and repeat. Wait 3 days before reattaching the cabinets to guarantee the paint hardens. Think about changing the deals with for an updated look. To decrease costs, visit your regional resale furniture store, much of which have big selections of hardware. August 31, 2015By Mr. Handyman.
" I have painted cabinets and we are having some problems with them, can you help?" A call we receive weekly. Below are the top 3 problems worrying painted cabinets - Cabinet Painting Contractors 28209. For the past ten years, one of the services we have had the ability to offer our clients here in the Fox Valley and Greater Chicagoland area is painting and refinishing cooking area cabinets.